CONTENT
PREPARATION

  • Stand with your back to the wind, remove the wing from its bag and place the leading edge toward you with the  battens facing up. Weight it down with sand.
  • Clear the bridle and connect the flying lines to the bridle by inserting the stop knot into the slip-knot (red with red and green with green).
  • Make sure there are no knots in the lines, as knots reduce the strength of the lines.
  • Unwind and clear the flying lines.
  • Attach them to the control system.
  • Inflate the 5 cross battens first, then the leading edge.
  • Put the bag, winder and pump away.
  • Put the harness on or attach the control system to your craft.
LEARNING PROCESS
Learn how to fly and steer a kite on dry land before using your Wipika for traction or going out to sea.


Take-off on land

  • If you have an assistant, ask him to hold the wing by the middle of the leading edge at 100° to the wind.
  • If you are by on your own, fold one of the tips of the wing up to the first cross batten, then cover it with enough sand for the wing to stand still.
  • In both cases, move to tighten the lines with the wing on the side of the flight window, almost crosswind.
  • Check for loops or tangles in the lines and the bridle.
  • Move back to tighten the lines. The wing gently takes flight.
  • Learn to stabilize it a few feet off the ground, to rise and descend on the other side without landing.


Waterstart

The ideal practice-area is shallow and with very small or no waves, so that you can crash the wing without any risk.

  • Learn how to land and waterstart the wing in shallow water. Do so until you master this manoeuvre.
  • If the wing lies flat, right side up or upside down, just let the wind tense the lines and unfold the wing. Then slowly pulling a couple feet left or right, let the wing get to the half-moon vertical position. It goes upwind up to the side of window of flight and, at this point, takes off when pulling the top line. Piloting the wing requires some finesse.

Caution:

  • Side-shore moderate winds are best for learning.
  • Do not fly in dead off-shore wind conditions.


Storage

  • Pinch the valves to start deflation.
  • Fold the wing and put it in it's bag.
  • Carefully rewind the lines and put the winder on one side of the bag.
  • For those owning a Wipika boom, the winder already on.
Windwindow


Landing

  • If you have an assistant, lower the wing to ground level on the side of the window of flight and ask him to catch it by the leading edge only. Do not let anyone near the trailing edge or flying lines. It can be dangerous. Then release tension in the lines, walk up to the wing and weight it with sand or deflate it.
  • If you are by yourself, place the wing above you then drop a line. The wing luffs and falls down. Choose a clear landing spot with enough room to keep lines clear of obstacles.

    Caution:
    When you drop one line, do not let it take the bar or handle with it! The bar or handle could hit someone!
  • Go to the wing, keeping the line tightened then weight it with sand or deflated.

To block the wing on the ground without excessive fluttering or chance to fly away, put it upside down, leading edge upwind and cross batten facing ground. Put sand along leading edge. In this position your wing can bear fairly strong winds.

BRIDLE


The internal bridle consists of 2 main Dyneema lines (high modulus P.E.) and secondary lines, which are tensioned when one of the flying lines is pulled.

The wing is properly tuned when the internal bridle is under slight tension in flight, which means one only need to pull a few cm/inches of the main lines for the wing to react.

If the wing steers poorly, it's probably either because the internal bridle is not tensioned enough, or because the tubes are not inflated enough.

If the lines getting tangled, they can easily be disconnected at several points, because all attachments feature a slip-knot and a stop knot.

Try to understand and memorize the internal bridle.


When and how to modify?

Generally, you will not have to modify the bridle. Do it only if you feel that your wing is difficult to control. For that, move the sliding knots along the stop knot lines. There are 6 knotted lines, 3 on each bridle side.

Example 1:
If you feel that the bridle lines (yellow) are slack and that your wing is difficult to turn, tighten the 2 bridle sides together as shown herebeing careful to follow the direction of the arrows indicated.

First adjust lines numbered 1 right and 1 left. If that is insufficient, then adjust lines numbered 2 right and 2 left.

Example 2:
If your wing tends to fly too much to the left, check the line length between the wing tips and the boom. They must be exactly equal.

If the right line is too long, shorten it by making a knot near the boom, in the green line.

If equal lengths still don't solve the problem, tighten the right side bridle as shown here, first at point 2, if not, then tighten at point 3.


[Bridle example 2]

How about going upwind ?

Wipika wings do so as well as any good boat or board sail,due to a sound aerodynamic profile.
The difference with a traditional sail is that it flys and naturally finds its best working angle.
But your ability to go upwind also depends on your craft :

- If you use a buggy/parakart or a boat with a long centre-board, you will go upwind as a boat (around 45° on each wind side)

- If you use a board, the ability will depend on its shape and your board handleing

- If you use your body, a kayak, a rescue raft, a motor boat or your grandmother bath, don't expect going upwind (unless you install a centre-board underneath).

When for the first bath race ?


How to fly a Wipika wing ?

A Wipika wing is easy to fly for two reasons :

- though stable it allows radical manoeuvers

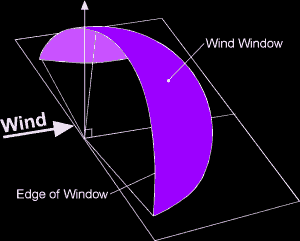
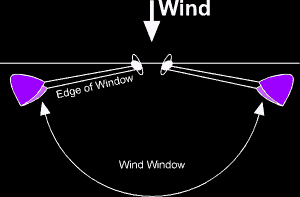
- it is more a "static" kite. That means that it pulls a lot when on a side of the wind window. It is not required to steer it and make patterns in the sky to obtain the pull except if you really are underpowered.


How about water launch ?

Only Wipika wing's have the ability to relaunch from water in a few seconds and without wing handling.

When your wing falls in, just work with the control bar, the wing will always inflate, even after being hit by 3 meter waves. Then let it go to the edge of the window of flight and launch it.

The minimum wind strength to relaunch the wing is 2 or 3 Beaufort depending on your ability.

Therefor, you need never be afraid of dropping your wing and you will progress much faster, taking all the risks in high jumps and tricks.


How to succeed on water?

Our advice: You will not have much success on the water unless you first become a good kite pilot. So you should buy a stunt kite or a Nasawing and become familiar with flying a two-line kite (while waiting for your Wipika wing). This will save you a lot of time.